When you think of a coffee brewer, the first thing that probably comes to people’s mind is the Espresso machine. Well, that’s because it’s one of the most popular coffee brewing machines used today. It’s swift, easy-to-use, and brews fantastic coffee. However, they can get quite expensive. Finding a good espresso machine on the market that costs less than a hundred bucks for your home can be almost impossible. So, should this be a hindrance to your cup of coffee every morning? No, there is a cheaper alternative household brewer known as the Moka Pot. In this article, I will be going over what a Moka pot is, how it works and how to use a Moka pot! Stay tuned.
What Is A Moka Pot?
The Moka Pot is an Italian-made coffee brewer that runs without electricity. These coffee brewers are also known as Stovetop Espresso Makers, as they depend on heat from stoves to pressurize the water needed to brew coffee within their container. The Moka Pot was invented by Alfonso Bialetti in 1933 and later spread to other parts of the world, including Europe and Latin America. The name “Moka” was inspired by the Yemeni city of Mocha, the port city that helped distribute coffee to all parts of the world. This coffee brewer has become a huge part of the Italian coffee culture. Nowadays, the Moka Pot is available everywhere in different styles and designs.

Now you’re probably wondering why someone would want to buy an expensive Espresso machine when there is a cheaper alternative. Before we make any decisions, let’s look at the differences between the Moka pot and espresso machine.
The Difference Between A Moka Pot And Espresso Machine
The Moka pot can brew coffee perfectly, but the truth is that the result is not an Espresso. An Espresso is made when hot water at a pressure of 8-10 bars is used to extract flavour from fine coffee grounds. This process results in a well-extracted coffee flavour that’s not bitter nor watery and can only be produced by an Espresso machine.
The case is different for a Moka pot. A Moka pot will pass hot water at a pressure of 1-2 bars through finely-ground coffee beans. This pressure range marks the highest produced by humans manually, but it’s not enough to brew an espresso. Instead, it usually results in a more concentrated coffee due to excessive extraction caused by the constant heat source, relying more on heat than pressure.

According to experts, a Moka pot’s coffee is at a coffee to water ratio of 1:7 while coffee from an Espresso machine is about a 1:16 ratio. Mathematically, a Moka pot will create a brew that’s about two and a half times stronger than an Espresso. Another difference is that Moka pots lack control and don’t always give consistent results.
A Moka pot doesn’t give its users much control because it lacks a group head valve function. This element is found in all Espresso machines and enables all the fine coffee grounds to receive a constant pressurized water flow for uniform flavour extraction. The most pronounced difference between these two brewers is the cost of purchase. Moka pots are much more affordable than Espresso machines.
The Anatomy Of A Moka Pot

How Does a Moka Pot Work?

A – The water base known as the bottom chamber contains the brewing water. When this element is heated, the pressure from the steam pushes the water through Section B and into Section C
B – This section is the coffee filter/coffee powder trough also known as the basket that holds the ground coffee.
C – This section is the coffee extraction pot, the chamber that holds your freshly brewed coffee.
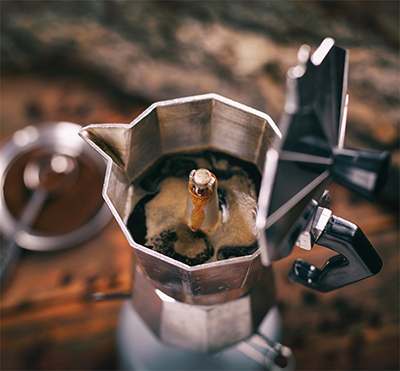
The design of the Moka Pot is the magic behind its astonishing brewing function. On the outside, the Moka pot is an eight-sided jug, but on the inside, there are three chambers- the lower, middle, and upper section. The lower portion holds water. There is a coffee filter/coffee powder trough in the middle, and the upper section is the coffee extraction pot where you collect your brewed coffee.

When water is heated up in the lower chamber, it builds up pressure and forces itself into the filter where there are coffee grounds and begins the brewing process. The brewing continues until the water gets enough pressure to force out the brewed coffee into the upper chamber. These processes will go on for seconds or minutes until your coffee is finally brewed and settles in the upper chamber.
How To Use A Moka Pot
The use of a Moka Pot is quite simple and straightforward. All you need to do is to perform the following steps carefully.
Step 1: Disassemble your Moka pot
Disassembling your Moka pot is a necessary step to preparing your coffee. However, it’s not as difficult and time-consuming as you think. It’s more like opening your food flask. You have to do this to separate the upper section, the filter, and the water trough because you will fill them separately with water and coffee respectively.
Step 2: Grind your coffee beans and pour your grounds into the Moka filter.
There is no special way of grinding coffee beans to be brewed in a stovetop espresso machine. You can use a commercial grinder or hand grinder to grind your grounds. The weight of the grounds should be around 20-22grams.
However, it would be best if you were careful of your ground size. Never forget the rule of thumb that says the smoother the grounds, the more the extraction. Besides, always keep it in your mind that the Moka pot makes a stronger coffee than the Espresso machine. Therefore, in my opinion, you should use grounds that are coarser than the ones you would use in your Espresso machine. You can play around with the size until you get the grind size which tastes great with you.
After you finish grinding your coffee beans, fill up your Coffee filter with the grounds. The grounds must be evenly spread and form a flat surface in the filter.
Step 3: Boil your water and pour it into the lower chamber of the Moka pot
The next thing is to boil water to about 200 degrees Fahrenheit. This temperature is just some degree below the point when bubbles begin to form on the water. If you are using a kettle with no temperature readings, you should boil the water to bubbles and let it cool down for a few seconds.
Actually, you may come across some other sources that would say that it’s not necessary to boil your water. You can use cold filtered water, but I strongly recommend using boiled water. The reason has been that starting with cold water may cause the pot to cook the coffee grounds before brewing. Meanwhile, starting with hot water will reduce the brewing period to prevent over-extraction.
After boiling the water, pour it into the lower (bottom) chamber of the Moka pot to a level just below the pressure relief valve.
Step 4: Place the Coffee filter into the pot and screw the top part
Gently place the filter into the pot and fix the top part of the stovetop espresso machine. However, you must ensure that the top is well tightened to the bottom to avoid pressure loss. When the pressure escapes, the pot brews a less standardized coffee.
BE CAUTIOUS: Use a cloth to hold the bottom when screwing the top part to prevent the risk of getting burnt.
Step 5: Heat the water on the stove
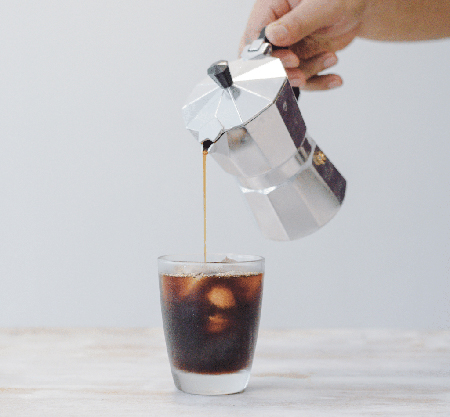
Place the Moka pot on the stove and start the burner. The pot’s heating will cause the water to pressurize, initiate brewing, and then push up the coffee into the upper chamber. But you have to make sure that you are using the right amount of fire. How do you do this? By observing how the brewed coffee is rising into the upper chamber. If the coffee is spraying everywhere, you need to turn down the fire a bit. And if it’s rising sluggishly, you need to turn up the fire.
Step 6: Wait and enjoy your coffee
The last step is to wait and let the coffee fill the upper chamber. Keep an eye on the brew. As soon as you notice the brown foam forming, your brew is finished. You can now serve your coffee. Some like to stir the coffee gently before they pour it out with a small teaspoon. You can also add sugar or milk; whichever way you like.
How To Clean Your Moka Pot
Just like other brewers, you need to clean your Moka pot regularly, and if possible, after every use to prevent the contamination of your next brew by the previous stale coffee flavour. The Moka pot can be cleaned by using warm or hot water, and you need to avoid soap. Soap is not necessary because it will wash away the oil left by the previous brew. Meanwhile, this oil will add to the flavour of your next brew. The most challenging part of cleaning a Moka pot is the funnel. However, you can easily wash it by using a pipe cleaner or a straw.
Conclusion
Now that you have been introduced to the usage and working principle of the Moka pot. There is no need to ask for what next. I am sure that you already have your Moka pot on the stove and awaiting your tasty coffee beverage. But know that you may not get it right on the first trial. You may have to play around with different coffee varieties and ground sizes to figure out what tastes best for you.
No products found.
IF YOU’VE ENJOYED THIS ARTICLE, GIVE IT A PIN!


1 comment